
Use a bastion to access your VM
To increase security and avoid Internet based attacks, it might make sense to run your VMs without a public IP address and just use a private IP instead. The only way to access such a VM will be through your private network in the Oracle Cloud VCN (Virtual Cloud Network).
Oracle’s bastion feature provides time-limited access to VMs that do not have a public endpoint. It enables you to create a bastion - that controls authorised users and allows them to SSH into a VM from specific IP addresses. Using this feature means that you do not need to deploy and maintain your own security-hardened bastion exposed to both your internal network and the public internet. It also provides a more managed method to inject your SSH key into the target instance and the bastion.
Prerequisites
To use a bastion, you’ll need a gateway in your VCN and a route rule for the gateway in your VM. The gateway could be a service gateway, an internet gateway, or a NAT gateway. The setup will work in any of the following combinations:
VM in a public subnet with a public IP address and a route to an internet gateway
VM in a private subnet (with no public IP address) and a route to a NAT gateway - this option will allow the VM to have an outgoing internet connection through the NAT Gateway.
VM in a private subnet (with no public IP address) and a route to a service gateway - this option will result in a completely air-gapped VM with no internet connectivity at all. But you’ll still be able to access it through your Bastion.
Note that having a VM in a public subnet, but without a public IP won’t work. For more details about these gateways and how to handle their services, refer to the Oracle Cloud documentation for - Service gateway, Internet gateway, or NAT gateway.
Create the IAM policy
If you are not an Administrator, you need to request the administrator of your Oracle Cloud tenancy to create an IAM policy granting access for you to use bastions. This will allow you to create bastions and operate it through the console, CLI or API.
Refer to the Oracle Cloud documentation for details on how to create the required IAM policy. It contains an example of the policy statements that the administrator can use to grant access to services in the whole tenancy, and that can be optionally restricted to a single compartment if desired.
You can create the policy using the console or the CLI.
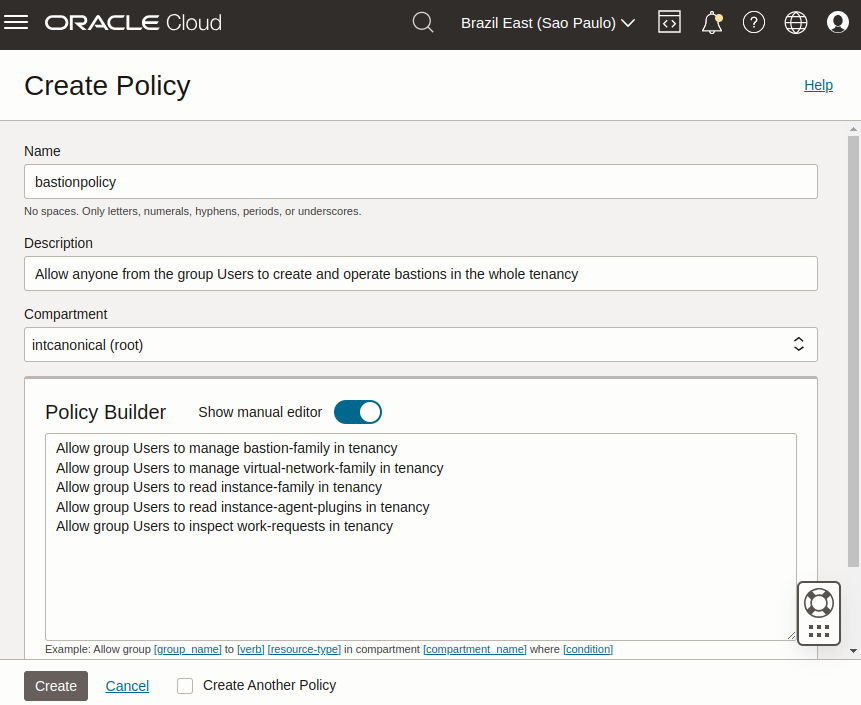
Go to Identity & Security > Identity > Policies and select the compartment where you want to create the policy (or root if you want to create a policy for the whole tenancy).
Select create policy and provide a name and description. In the Policy Builder section, enable Show manual editor and paste your policy statements (as from the example in the Oracle Cloud documentation).
Run:
oci iam policy create \
    --compartment-id <compartment_id> \
    --description "Allow members of the Users group to create and operate bastions" \
    --name bastionpolicy \
    --statements  '["Allow group Users to manage bastion-family in tenancy", \
                    "Allow group Users to manage virtual-network-family in tenancy", \
                    "Allow group Users to read instance-family in tenancy", \
                    "Allow group Users to read instance-agent-plugins in tenancy", \
                    "Allow group Users to inspect work-requests in tenancy"]' \
    --region <home_region>
When creating the policy through the CLI, you must use your home region.
Install oracle-cloud-agent on the VM
If you are using the images created by Canonical and published by Oracle (as described in Find Ubuntu images on Oracle Cloud), they already have the oracle-cloud-agent pre-installed by default, and no additional action is necessary.
To check if the agent is installed, run:
sudo snap list
To list the available channels for the oracle-cloud-agent (you need to select the channel matching your Ubuntu release), run:
sudo snap info oracle-cloud-agent
To install the agent, run:
sudo snap install oracle-cloud-agent --channel=<release-specific-channel>
Enable the bastion plugin on the VM
You can enable the bastion plugin on your VM using either the console or the CLI.
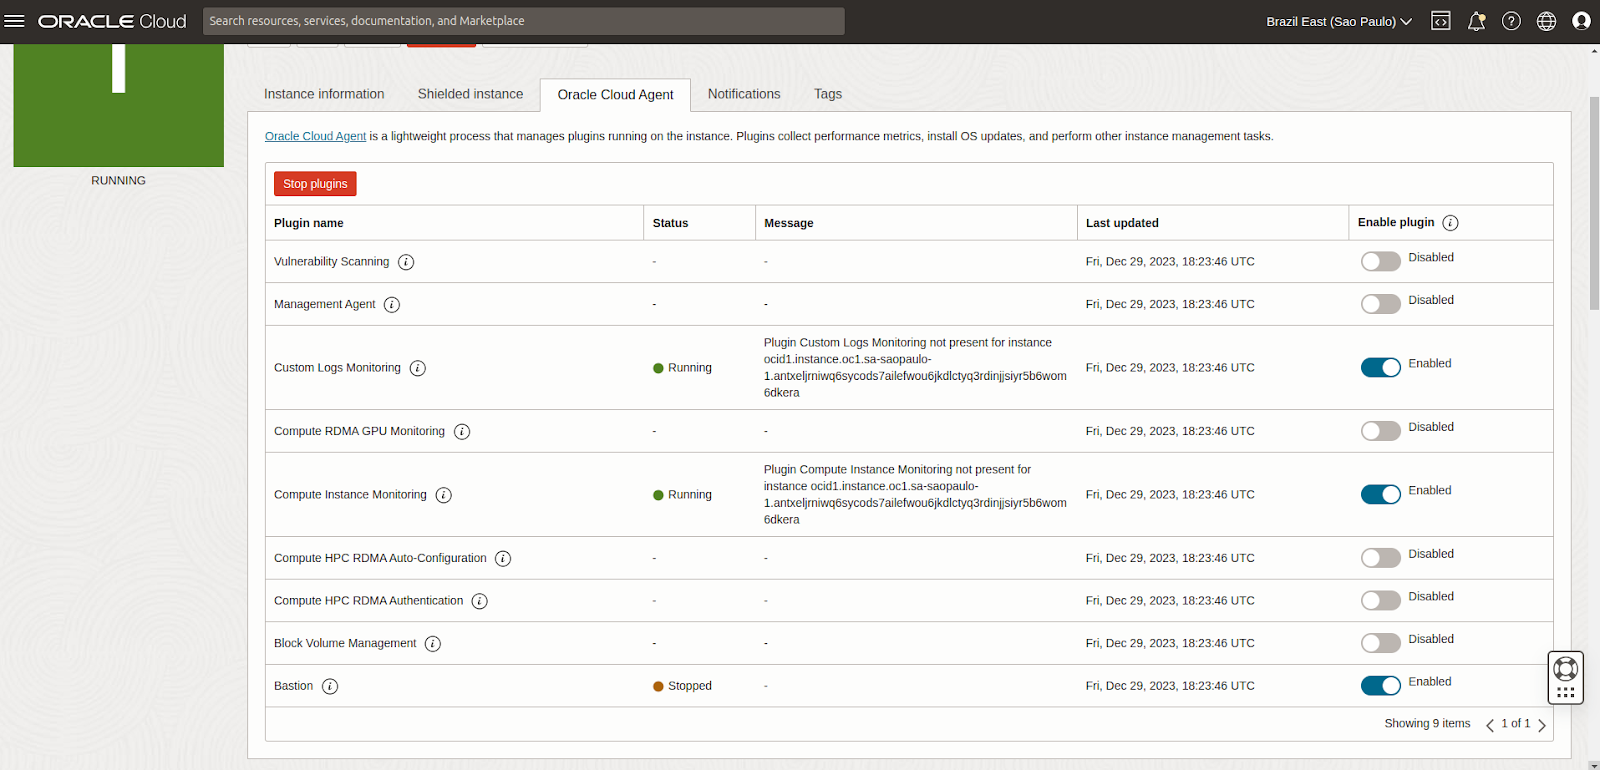
Go to your instance, navigate to the Oracle Cloud Agent tab and enable the Bastion plugin (it is disabled by default):
Create a JSON file (enable-bastion.json) containing:
{
    "pluginsConfig": [
        {
        "desiredState": "ENABLED",
        "name": "Bastion"
        }
    ]
}
Update the agent-config of your VM using the JSON file as input:
oci compute instance update --instance-id <instance_ocid> \
    --agent-config file://./enable-bastion.json
Even though enabled, the status will initially show up as Stopped. It might take up to 10 minutes for the plugin to start running in the VM. Wait until the status changes to Running before proceeding.
Create a bastion
When the bastion plugin shows up as Running in the cloud console, if you have access to the VM (through console or some other method), you should see a new log directory created inside the VM under /var/log/oracle-cloud-agent/plugins/bastions/. Also, if you look at /var/log/oracle-cloud-agent/agent.log, you should see indications that the plugin has started, something similar to:
2023/12/29 18:30:48.004902 health.go:107: health check of plugin:[bastions], desiredState:[Enable], currentState:[notStarted], status:[yet to start] version:[v0.0.0] err:[<nil>]
2023/12/29 18:30:48.004912 orphan.go:28: cleaning orphans of plugin:[bastions] with signal SigTerm
2023/12/29 18:30:48.008749 orphan.go:33: cleaning orphans of plugin:[bastions] with signal SigKill
2023/12/29 18:30:48.011165 health.go:137: starting plugin:[bastions]
2023/12/29 18:30:48.011180 plugin.go:52: creating plugin:[bastions], elevated: false, runas: , exe: /var/snap/oracle-cloud-agent/common/bastions
2023/12/29 18:30:48.203266 health.go:145: started plugin:[bastions]
You can create the bastion using either the console or the CLI.
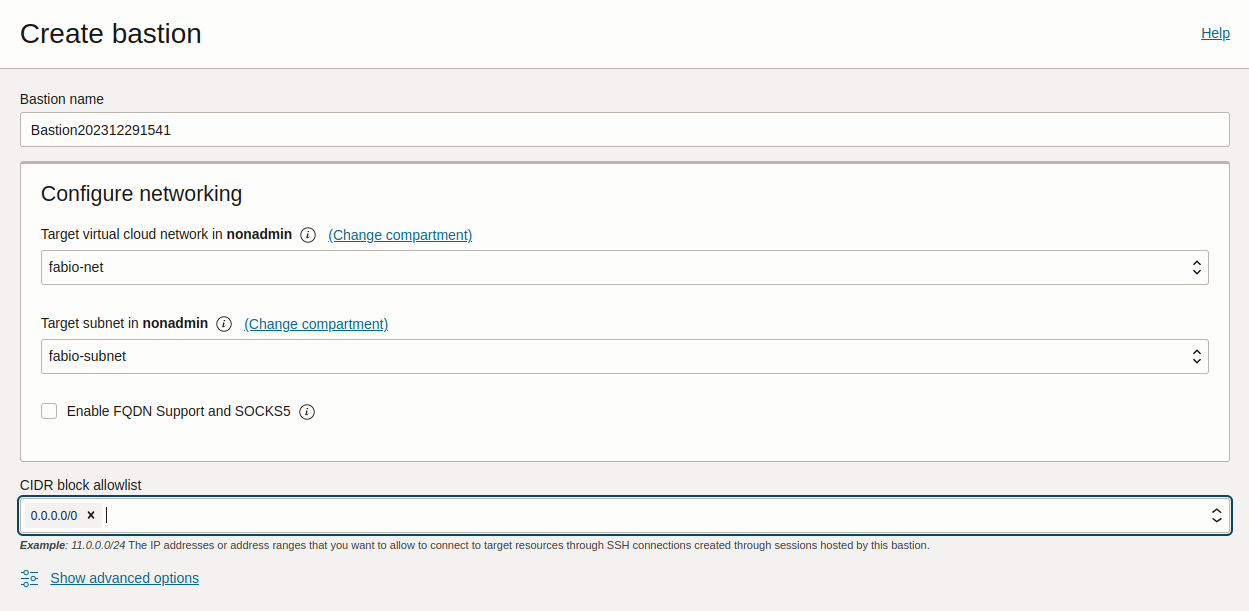
Go to Identity & Security > Bastion and select Create bastion. Provide a name and select the VCN and subnet where the bastion should be created.
Under CIDR block allowlist, specify the network address range from which you want to provide access to your bastion. For instance, you can restrict the bastion access to only valid IP addresses that your ISP assigns to you, so that it would be accessible only from your network. Note that currently, only IPv4 ranges are allowed.
If you want a less secure approach, you can let the bastion be accessed by any address, as in the example below:
To create the bastion, run:
oci bastion bastion create
        --bastion-type standard \
        --compartment-id <compartment_ocid> \
        --target-subnet-id <subnet_ocid> \
        --client-cidr-list '["0.0.0.0/0"]'
This allows access to the bastion from 0.0.0.0/0, i.e from anywhere. If you want to restrict the access to specific networks, you can use their IP addresses instead.
The command returns a JSON containing information about the Bastion, including its OCID. Note that OCID for later use.
If you need to list your bastion to get its OCID, run:
oci bastion bastion list --compartment-id <compartment_ocid> --all
Note
The use of ‘bastion’ twice in the above commands is a requirement and not a typo!
Create a session to access the VM
Once the bastion goes into an Active state, you can create a session using either the console or the CLI.
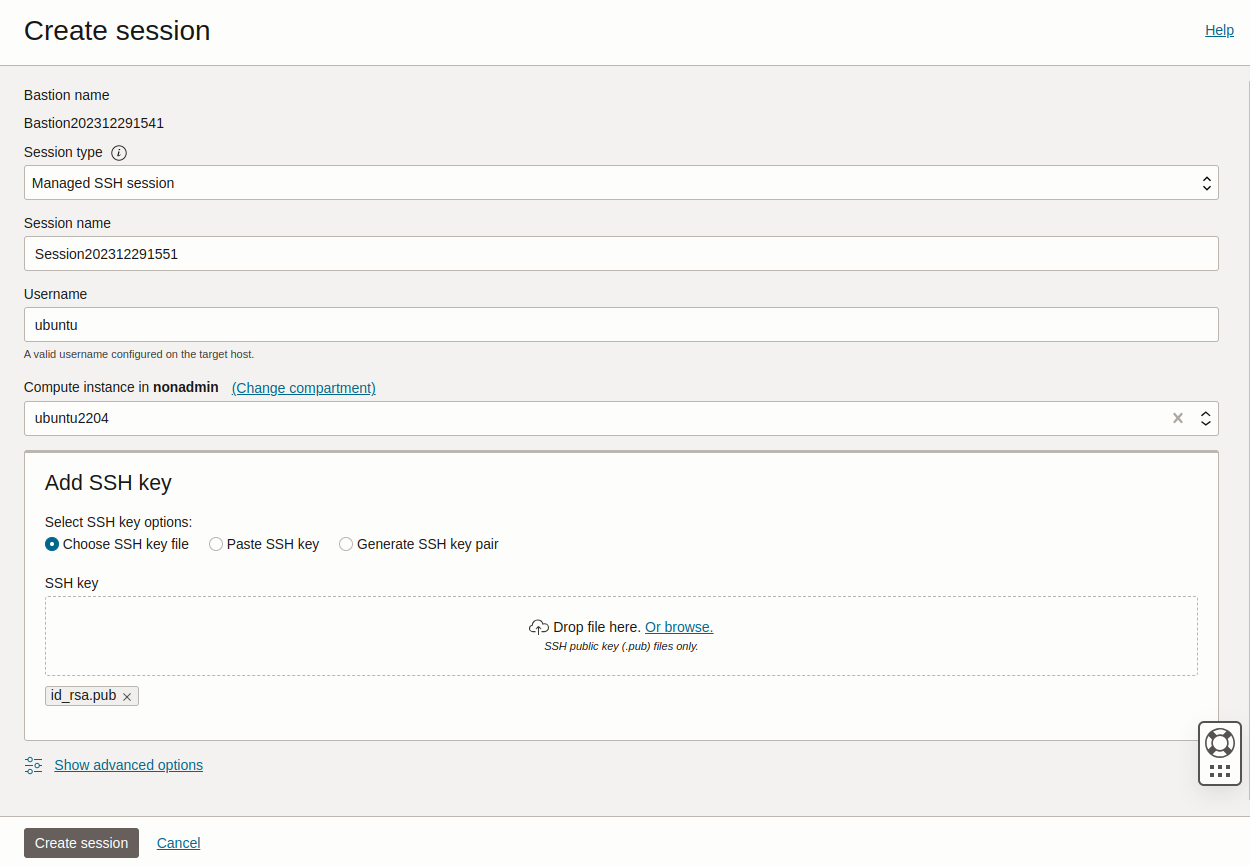
Select your bastion and choose Create session. Fill in the details:
Session type: Managed SSH session
Session name: any name of your choice
Username: ubuntu (if your VM is an Ubuntu instance, the default user is ubuntu)
Compute instance: <the VM that you would like to access through the bastion>
Add SSH key: Add a public SSH key to inject into the bastion and the VM (you must have access to the corresponding private key)
Run:
oci bastion session create-managed-ssh \
        --bastion-id <bastion_ocid> \
        --ssh-public-key-file <path_to_id_rsa.pub_key> \
        --target-resource-id <virtual_machine_ocid> \
        --target-os-username ubuntu
where
<path_to_id_rsa.pub_key>should be replaced with a public SSH key that you want injected into the bastion and the VM (you must have access to the corresponding private key)<virtual_machine_ocid>should be replaced with the OCID of the VM to be accessed and‘ubuntu’ should be replaced with the username that you would like to use to SSH into your VM (‘ubuntu’ is the default username in Ubuntu images)
Note
The SSH key that you use here, will be temporarily added to .ssh/authorized_keys in both the bastion and the VM. So when you try to access the VM in the next step, you’ll have to provide your private key twice - once to SSH into the bastion, and then again within a proxy command to SSH into the VM.
Access the VM
You can access the VM using either the console or the CLI.
When the session is created, use the Copy SSH command from the 3 dots menu to get a command similar to:
ssh -i <privateKey> -o ProxyCommand="ssh -i <privateKey> -W %h:%p -p 22 ocid1.bastionsession.oc1.<region>.<id>@host.bastion<region>.oci.oraclecloud.com" -p 22 ubuntu@<ip>
This command will create a tunnel through the public hostname of the bastion to the private IP address of your VM. Replace <privateKey> with the path of your private key, and you should have SSH access to your VM using the bastion.
Check if your managed SSH session is in the ‘ACTIVE’ state using:
oci bastion session list --bastion-id <bastion_ocid> \
            --session-lifecycle-state ACTIVE \
            --sort-order asc --all --query "data[0].id" --raw-output
The command displays the OCID of all the managed SSH sessions in the bastion that are in the ‘ACTIVE’ state. You might have to repeat the command a few times till your session becomes ‘ACTIVE’. An ‘ACTIVE’ session indicates that you can now connect to your VM.
Using the managed session OCID obtained above, run:
oci bastion session get --session-id <managed_session_ocid> \
            --query "data.\"ssh-metadata\".command" --raw-output
This returns the SSH command needed to access your VM, and will be something similar to:
ssh -i <privateKey> -o ProxyCommand="ssh -i <privateKey> -W %h:%p -p 22 ocid1.bastionsession.oc1.<region>.<id>@host.bastion<region>.oci.oraclecloud.com" -p 22 ubuntu@<ip>
Replace <privateKey> with the path of your private key, and use the command to access your VM through the bastion.
Further references
The Oracle Cloud documentation is a good resource for more information about its bastions: